Introduction:
When you start your laptop/PC. You can see at Windows login
screen user account with a small picture. That small picture is the user
account picture.
In this blog I will give you a proper way for how “How to Change or Remove a User Account Picture in Windows 10?”
Read all the steps given below carefully. You should follow the following steps as given below.
How to Change or Remove a User Account Picture in Windows 10
Basically this blog contains major Two Steps. First is add new user account picture. Second delete old user account picture.
Step 1: Add new user account picture
In this step you have two choices. First you can add new user account picture. Second you can add default user account picture.
(I) If you want to add new picture, then you can choose picture you want to show in following way.
It contains Two Steps:
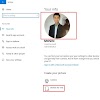
(a) Go to Setting > Click on Accounts > Click on Browse for one
Note: You have to search where your photo is present in your laptop/PC.
Now your new user account picture is ready.
(II) If you don’t want any picture to show then you can choose user or guest picture from default account pictures.
It contains Two Steps:
(a) Go to Setting > Click on Accounts > Click on Browse for one > Go to Local Disc (C:)
> Click on Search Bar > Type Account Picture > Go to the folder Default Account
Pictures
But still your old user account picture is there. Now the next step will help you to delete your old user account picture.
Step 2: Delete old user account picture
It contains Two Steps:
(I) Go to This PC > Click on Local Disc (C:) > Click on Search Bar > Type Account Picture
and Enter > Click on the folder Account Pictures
Note: See Third Image to see above steps
(II) Select old user account picture you want to delete > Right click on that picture > Then
click on option Delete
Note: If you directly delete your user account picture then it is not necessary it will remove.
Conclusion:
From the above we can conclude that there is direct method to change your user account picture but you cannot delete your old user account picture.
You have to go through proper way given above. You can set new user account picture or you can set default user account picture.
I hope that, you have understood about “How to Change or Remove a User Account Picture in Windows 10”.
If you didn't get my words then feel free to comment bellow, your opinions are much valuable for us.
Thank you 😊.


